
How I Organize Our Summer
You might not guess it from my posts, but the truth is I am the QUEEN of procrastination. No matter how hard I try there is always a little voice in my head whispering “Why do it now? You have tons of time. Why don’t […]

You might not guess it from my posts, but the truth is I am the QUEEN of procrastination. No matter how hard I try there is always a little voice in my head whispering “Why do it now? You have tons of time. Why don’t […]
Can you believe it’s already almost Valentine’s Day?? This year the holiday completely snuck up on me and I found myself scrambling at the last minute to come up with the perfect treats for Nugget and Goose to exchange with their friends, classmates and teachers. […]

So I’ve been dying to ask, “Did you try out any of the Preschool Space Activities introduced on Monday?” I have a dear friend who tried making the planet magnets yesterday and even though they ended up pretty lopsided (she was ready to call them a fail!) her kiddos LOVE them! She called me this morning and couldn’t believe how much fun her little girl was having. She kept asking her the names of the planets and then going around the house looking for things they would stick to.
If you’re having a little trouble remembering the planets yourself, then today is your lucky day! I’ve designed a new set of space themed Nomenclature Cards. I also have a fun new sensory bin and a constellation activity. Let’s jump right in!

If you’ve been hanging out at Nugget & Goose for any amount of time you’re already very familiar with my love of Montessori nomenclature cards. I don’t see myself ever leaving them out of a tot school unit. If you aren’t already familiar with them, this handy post will explain everything you need to know about how to use them and why they are so fantastic.
This set of space nomenclature cards consists of 27 unique images and covers all of the planets in the Safari Ltd Safariology Solar System, as well as many of the objects in the Safari Ltd Space TOOB
The images are all high quality photographs that are sure to attract your child’s attention. But since this is starting to sound like Ad copy I’ll get straight to the good stuff: how to play with them!

I found that this set of nomenclature cards worked really well in conjunction with the clay planet magnets and play mats I mentioned earlier this week. Nugget really enjoyed when I showed him a nomenclature card with a planet, and then he could find the corresponding magnet to hold up. If you really have it together you could use the images on the cards as your guide to make the clay planets. Then they would match quite a bit better than my own 🙂
I have also used the cards with Goose to play several learning games. I allow him to independently match the cards to their corresponding Safari Ltd. pieces which he always enjoys, and then once I feel confident in his vocabulary I ask him to play sorting games where he finds all the cards with a ‘M’ sound etc. He is really on the cusp of reading so phonics games are great at this age! A final game we play is what I call the ‘story game’, he uses the cards as prompts to tell a story. So for example he might have to make up a story about Neptune, a lunar rover and a space chimp. I try to record these when he tells them because they always crack me up!
Of course you would! Why waste your valuable time making what I already have? This set of cards and many others are all available for free in my Digital Resource Library. All you have to do to get access is join with your email address below.

Here is another way to use the Safari Ltd. figures I mentioned above, and best of all it’s EASY! All you need is a few tablespoons of black water beads (and a few clear as well if you have them). Pour the beads in a small bin and submerge in water overnight. When you wake up you’ll find a glistening bin of plump black water beads ready for play! I buried all of our Safari Ltd. figures and prompted Nugget and Goose to go on a ‘deep space scavenger hunt’!
I still have to watch Nugget pretty closely with these beads because they look a little too food-like for my comfort. They have a particular tendency to bounce so if one escapes from your bin you may never find it (but I guarantee if there’s a toddler in your house they will find it the minute you turn your back.) … Or is that just Nugget? 🙂

I feel like so much of what we learn about space can feel very abstract. We tell our children about these far off planets and colorful nebulae but they can’t really see it and experience it themselves. Spending time outside star gazing is a fantastic way to bridge this gap and create a connection for your kids. If you live out in the country you’re absolutely golden (and I’m super jealous!) but for the rest of us there are usually parks or even a planetarium that you can visit to help your child get close to the cosmos.
I created this activity to teach my boys about constellations. It doesn’t require too much preparation and even my nephews who are in 5th grade enjoyed this activity! So gather your supplies and then check back in the comments to let me know how it went.


Hello! I’m finally back with another full-length Tot School unit! The past month has been so busy with traveling, getting the kids back to school (school started on July 31st here – it’s insane!), and most importantly Goose turned 4! Needless to say I have had my hands full, but even when I wasn’t here sharing content with you I was still brainstorming ideas and I have some AMAZING stuff in the pipeline for you guys. First, is this awesome tot school unit full of toddler and preschool space activities. This will be a longer than normal unit, so be sure to sign up for my emails so you won’t miss a thing. I’ll never spam you but I WILL send you access to my complete library of free resources. Think worksheets, templates, TONS of nomenclature cards and more!
So, the ‘Great American Eclipse’. Did you watch it? I feel like the whole country went crazy with eclipse fever and of course our house was no exception. We were loaded down with our eclipse themed snacks (Moon Pies, Sun Chips, Capri Sun, & Milky Way Bars of course!) and I even made eclipse pancakes for breakfast. After all the hype I feel like the experience was kind of a letdown. We live close enough to experience 97% totality and if no one had told me we were having an eclipse I probably never would have noticed. The one good thing that came out of it though was a newfound interest in space for Nugget & Goose. Now both boys want to be astronauts and fly to Mars.
I created these preschool space activities and tot school unit at Goose’s direct request, so they are definitely kid tested and kid approved. I can’t wait to hear how your kids like them too – tell me in the comments!

These magnets were so much fun to make and require absolutely no artistic ability whatsoever. Best of all, your shopping list only has 2 items on it! This is definitely a project that you could knock out during nap time while you binge on Netflix, or if you have an older child let them help or even make their own. At (almost) 2 and 4 both of my boys have enjoyed working with these magnets. Nugget enjoys the resistance of lifting the strong magnets off the cookie sheet and matching them to the play mat. Goose is able to name all of the planets and is now working on placing them in their correct order.
Edit: It has now been more than a week since I introduced this activity and Nugget is still requesting it multiple times a day. This may be one of my most successful activities ever!


OK, you’ve spent an hour of your valuable time making these things – what do you do with them? I have that part covered for you! I designed a set of 3 play mats to use with your solar system magnets. The first play mat features all of the planets in our solar system for easy matching. This is a great starting point, particularly for younger children. After your child becomes more comfortable naming the planets and their order you can progress to the second play mat which shows the sun and lines for each planet’s orbit. Finally the 3rd play mat is an image of space with no planets. This is perfect for free-play or allowing a child to fully recreate our solar system on her own. I recommend laminating your play mats for increased durability and using them on a small baking sheet.

Ready for your FREE Printable Play Mats? Sign up below to get access to our free digital resource library full of fun printables and activities!

Size discrimination is an early math skill that builds the foundation for so much later in life. This activity takes those size discrimination skills a step further by adding a fine motor component. When you do sizing activities with your toddler they develop vocabulary (larger, smaller, medium) and communication skills. Would you ever have guessed before having children that putting objects in boxes could be so educational?!


I find that the activities I create draw more attention when I present them in an attractive way. This makes it seem ‘special’ and the child is eager to participate. I recommend placing all 3 boxes on a tray along with a small bowl or basket containing the gold stars. When your child is ready, demonstrate the various sizes of stars and show them how to place a star in the slot. As a Montessori-inspired activity it is self-correcting. This means that the child will only be able to fit the large star into the large slot, thereby correcting the child if he or she attempts to place it in the wrong box. Once all the stars are in the box you can show your child how to open the box to retrieve their stars. This will probably be their favorite part.
Nugget had so much fun with this activity. He isn’t interested in the sorting the stars, but Goose really enjoys helping him with that part. In fact, I assumed this activity would be too easy to attract Goose but he really enjoyed helping to sort the stars and experimenting with how many could fit in one slot. Anything that occupies both boys and has them getting along is a HUGE win in my book!

Can you believe that it’s already July?! It feels like this summer is just flying by. Next week people all across the United States will be celebrating the 4th of July, and for different people that means different things. It might mean fireworks, a trip to the beach, or a backyard bar-b-que. For me, it means all of those things PLUS an excuse to do a new red, white and blue themed tot school unit. My family loves the 4th of July so we always go all out and this tot school unit is no exception. Keep reading for crafts, Montessori trays and lots of free printables!

Seriously, who doesn’t love Honest Abe? I designed this fun popsicle stick craft to honor our 16th president and provide a jumping off point to talk about our country’s history. This is a simple art project that could easily be modified for even younger children. Simply replace the paint with washable markers, and maybe provide a little help with the gluing.


My boys had so much fun with this activity! I actually did it with Goose last year, and then brought it out again this year. Even though it is much less challenging now he still enjoyed the activity quite a bit. The best part is that it requires almost no prep work!
All you need is a package of toothpick flags (Mine were sold as cupcake toppers!) and a square piece of floral foam. That’s it. See, I told you it was easy! Now let your child poke each toothpick flag into the foam. There is just enough resistance from the foam to build hand strength, which is vital to develop the muscle control necessary for writing.

This set of nomenclature cards features 18 patriotic vocabulary words. There are basics like ‘Fireworks’, ‘Statue of Liberty’, and ‘Bald Eagle’ as well as a few more advanced concepts like ‘Declaration of Independence’ and ‘Revolutionary War’. Of course, as a parent it’s always up to you to decide just how much information your child is ready for. I hope that this free download will help with whatever way you wish to teach your children about the history of Independence Day.
You can download your own free set of Patriotic Nomenclature cards from my Digital Resource Library. Sign up below to get the password!

I continued to work on my boys’ fine motor skills with this easy Montessori spooning activity. I presented a tray with 2 dishes, one of which was full of assorted red, white and blue beads. Then I carefully demonstrated for Nugget how to scoop up a spoonful of beads and pour them into the adjacent dish. He spilled plenty, but he also surprised me with just how well he did. The really wonderful part was when Goose came over and began helping him. Brotherly love at its finest, and it just melted my heart!

Some of the activities I have listed today are better for slightly older children, so I wanted to include something for the younger siblings as well. I found this set of 4th of July gel window clings in the Dollar Spot at Target. They are VERY sticky and stretchy, so I introduced them with a child-sized cookie sheet (I think it came from this Melissa & Doug cooking set). The primary activity was to peel the star clings off of their backing and stick them to the cookie sheet. As it turned out, they were so sticky that it turned into great sensory play.
I think that a child as young as 6th months would enjoy touching and interacting with the sticky texture if you placed them on a cookie sheet yourself. As always, watch your child to ensure that they don’t try to eat them (and if it were me, I would wash hands after handling, who knows what chemicals are in these things – eek!)

After so many activities for the littles, here is something for the Mamas! This download features 3 separate 8×10 designs, perfect for framing or adding a patriotic touch throughout the house. Visit my Digital Resource Library to get yours, and have a Fabulous 4th of July!!
Don’t miss Part 2 of my 4th of July Tot School Unit!

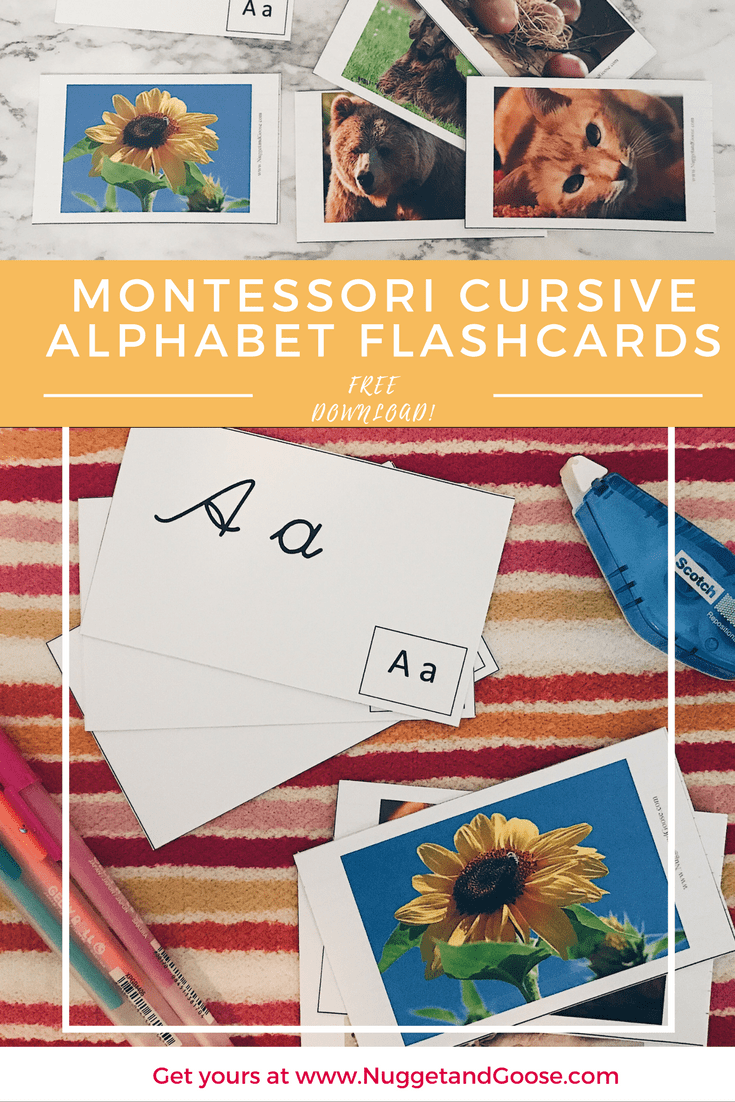
A key component of Montessori primary education is that children learn to write in cursive first. I was initially surprised by this since traditional education teaches cursive writing later (if ever!). However once the philosophy behind it was explained, it made perfect sense. If you look at a young child’s scribbles, they usually consist of loops and wavy lines. Their writing flows from one shape to the next without lifting their pencil. Sound familiar?
Pre-writing naturally tends to mimic cursive. This is why the Montessori philosophy teaches cursive first – they believe it comes easier to young children.
Unfortunately I have found that cursive writing materials for preschool aged children are remarkably difficult to find. Most workbooks for this age group focus on printing letters. The few Montessori-endorsed materials I found were often very expensive and had to be ordered online.
When I brought this up with Goose’s teacher she helped me to devise a flashcard system that I could make on my own. After taking the time to create these fabulous flashcards, I just had to share them with you!
I designed my flashcards to fit on standard 3″ x 5″ note cards. Every flashcard features a front with an upper and lower case cursive letter, along with a small inset script letter. On the reverse is a large high resolution photograph of an animal or object that begins with that letter. I have even included an additional blank template in case you wish to replace an image with one of your own. It turned out to be much harder than I expected to come up with what I hoped would be a universally recognizable image for each letter. The last thing I wanted was for children to get confused because they saw ‘yak’ and thought ‘cow’ or saw a ‘yacht’ and thought ‘boat’. (So I went with Yogurt for Y which probably isn’t much better, but it is what it is.)

Assembly is very simple for these cards. Simply download and print the flashcards, cut out each card (It will go much faster with a paper cutter like this one from Swingline.) Then use a tape runner to adhere the front and back to a 3×5 notecard. If you wish to make your flashcards even more durable you could laminate them, which is what I did after taking pictures. Laminated items really don’t photograph well for me.

These flashcards have both the cursive letters as well as script letters on the front. The idea is to cover the script letter with your thumb and ask your child what sound the cursive letter shown makes. If your child is struggling, move your thumb to reveal the script letters. We see these so much in our society that many children pick them up naturally. Finally, show your child the object or animal on the back of the card so they link the ‘buh’ sound of the letter B with ‘bear’ etc. It may be helpful to note that in Montessori schools children do not initially learn the names of letters, they are called by the sound they make.
You can also use the flashcards in reverse by showing your child the picture first. Have him name the sound that the image starts with and then turn over the card to reveal the letters that make that sound.
This is the best part – the flashcards are free! All you have to do is sign up below. You will then receive a link and password to my Free Digital Resource Library. You will never get spam from me but you WILL get access to an ever-growing library of printables, templates and more. What are you waiting for?

It’s Friday, and that means the end of another fantastic week of Tot School. This is the final post of my Farm themed tot school unit. If you missed the first 2 parts, you can find them here, and here.

This is a fantastic Montessori-based activity that focuses on spooning. Spooning is a fantastic way to develop hand strength and muscle control which is vital when children begin learning to write. To present this activity I placed a tray on our learning center with 3 small ceramic ramekins, one larger ceramic ramekin, and a spoon. Inside the larger ramekin I poured about 1/2 Cup dried split peas. The 3 smaller ramekins each contained a chicken figurine from our Battat Farm Animal Set.
I then demonstrated for goose how to carefully scoop up one spoonful of peas and pour it into a ramekin. He up the necessary motions quickly and was soon rotating out his chickens so that all of our farm animals could be fed.

It’s important to note that no matter how careful your child is, you will ultimately end up with peas on your floor. However, presenting this activity on a tray does help keep the mess contained.

I came up with the idea for this activity when I noticed that Nugget was having a hard time distinguishing between the animals in our Battat Farm Animal Set. This set contains 60 figures, 5 of each species. Unfortunately, unlike Safari Ltd. Toob figures, these have less detail and very similar coloring. To be honest, there are times when I have to take a closer look to determine what animal I’m looking at. Instead of being frustrated I decided to use the similarities to help develop visual discrimination skills.

I purchased these wooden trays several years ago at Target, but this one is very similar. Inside each tray I adhered a set of 4 Velcro tabs. The opposite side of the Velcro tabs was attached to a laminated image of each type of animal. This provided a great deal of variety in the sorting, because I could group up to 4 types of animal within each ‘fence’.
Once the activity was prepared, I gave a lesson to both Nugget and Goose. I showed them how to sort through the animals to find the ones that match the picture within each tray. For Nugget, I kept the activity very simple. I began with only a single, easily identifiable animal in each pen. Then I gradually increased the difficulty.

For Goose, I focused on the animals that looked the most alike. Then I encouraged him to carefully examine the animals to find characteristics that make them easier to identify. I.e. the goat and the dog figures are very similar so I helped him check for horns to tell the two apart.

I designed this set of clip cards to help children begin to recognize the sound that words start with, and then associate that sound with the corresponding letter. We love to play “the sound game” with Goose when we’re driving in the car. I pick an object and ask him to tell me what sound it starts with. Then we take turns trying to think of other words that start with the same sound. This is particularly great because I often come up with words that Goose isn’t familiar with so he is building vocabulary as I explain what the words mean.

The sound game can easily be adjusted to accommodate older children. Ask them to identify the sound that a word ends with or even a middle sound. As children become more accustomed to this game, you can begin to introduce clip cards like these. The idea is for the child to name the animal shown, then identify the sound that it starts with. Finally, have them point out the letter that makes that sound. They are called ‘clip cards’ because parents often have the child use a clip or clothespin to mark their letter selection.
I like to present the cards on a metal tray or cookie sheet along with a set of small magnets. (As always, keep small magnets away from young children for whom they could present a choking hazard.) To get your free set of printable clip cards sign up below. You will receive your link and access code for my Free Digital Resource Library. Hint: There’s a lot more there than just clip cards!

What do you think? Did you enjoy this week’s farm unit? Let me know how it went, and what unit themes you would like to see next in the comments below.

We are rolling right on through our farm themed tot school unit, and so far we have been having a blast! If you missed Part I, be sure to check it out. There were some really great crafts, recipes and activities for preschool or tot school. Today, our farm unit is going to the birds – literally! All of our crafts and activities revolve around poultry, so we will be feeding poultry, gathering eggs, gluing feathers and much more. Let’s get started!

I think counting mats are such a fun way to combine fine motor skill development with early math skills. Plus, they make counting just a little more fun. I designed these mats for counting up to 20, although you could easily use only the first 10 to match your child’s skill level. On each card I have featured one or more bird from the farm, and these birds are hungry! I recommend using dry corn kernels but you can use any dry beans or small counter that you have at home. As always, any small object (such as corn kernels) can post a choking hazard to small children so use your own best judgement.
While Goose enjoyed working his way through all 20 counting mats, Nugget had fun helping by trying to name what type of birds were on each card. It’s always great when a learning activity can include both an older and younger sibling!
Visit my Digital Resource Library to download and print your free copy of my Feed the Chickens Counting Mats. Don’t have an access code? Easy! Just sign up below and one will be emailed to you right away!

I wish I could take credit for this activity but all the credit for this one goes to Kim at Life Over C’s. Definitely check out her site for some fantastic learning activities and to download the printables for this fun activity.
This activity features a printable mat showing a wide assortment of fruits and veggies, along with a matching set of fruit and veggie cards. A quick pass through the laminator and a few Velcro tabs later and you have a fun and educational sensory bin search! I used Popsicle sticks and card stock to make garden signs that I adhered inside our sensory bin with a hot glue gun. This was definitely one of our cuter activities, and digging through the beans to find each fruit or vegetable kept Goose occupied for quite a while.

When we began I figured this would be one of those short-lived activities that wasn’t challenging enough for Goose but was a bit advanced for Nugget, boy was I wrong! It turns out that Goose’s fruit and veggie vocabulary isn’t quite as advanced as I thought and he learned a lot as he dug out each card and then let Nugget help him find the match.
Of course, soon the tractor was digging out the vegetables, and I had to watch Nugget like a hawk to be sure he didn’t try to eat the black beans, but overall I would call this one a win!

For this project we decided to create our own pet roosters! Goose named his ‘Captain Picklepuss’, which is of course a very respectable name for a rooster. We decorated our roosters using glue, feathers, crayons, and pretty much anything else Goose dug out of our craft closet. The end result was a rooster that would be the talk of any barnyard, I’m sure.


Visit my Digital Resource Library to download and print your free Rooster Printable. Don’t have an access code? Easy! Just sign up below and one will be emailed to you right away!

My boys have very active imaginations and adore pretend play. I think that the creative thinking skills developed during imaginative play are vital to future success, so we put a lot of emphasis on it in our house. When shopping for toys I always avoid what Alton Brown calls ‘Unitaskers’. These toys that can only be played with in one specific way just seem limiting and are rarely the toys that see repeated play.
For this activity I made nests out of paper bags (instructions below) and then filled each nest with a few plastic Easter eggs. We were a little short on stuffed chickens so our nests included a variety of feathered occupants. After staging the nests, I also laid out a cowboy hat for costuming, and an egg carton for additional sorting practice. I gave each boy a basket and encouraged them to gather eggs and just have fun. Not surprisingly, Nugget decided to fill his basket with poultry and lovingly carry them throughout the house, carefully clucking and quacking at each one. This is such a sweet age! Goose took the task a little more seriously and was very intent on gathering all of the eggs, and opening each one in search of leftover Easter candy. As if candy would last that long in our house!
They returned to this activity several times this week, and each time they found new ways to interact with the nests. My favorite was when I walked into the room to find Nugget sitting very carefully on a plastic egg. Evidently his brother told him if he sat still long enough it would hatch! Oh how I hated to burst that bubble!


We had so many farm themed books in our collection, that this was one tot school unit that hardly required a trip to the library. Here are a few of our favorites:
This is a book that I picked up a few years ago at a consignment sale, and it has been a favorite of ours ever since. It’s pretty short, but the novelty lies in the fact that it places you inside the tractor. It’s a fun short read perfect for a toddler who is just getting into tractors.
This is the original Otis book, although there are now several in the series. It tells the tale of a sweet tractor and his friendship with a lonely calf. The illustrations are striking and the plot is well-written enough that parents and children should both enjoy this story.
 The Grumpy Morning by Pamela Duncan Edwards
This is a cute book about the morning that the farmer overslept. I like the fact that the farmer is a woman, since too many farm books only feature male farmers. It also has a nice rhythm that makes reading it aloud pleasurable.
 Moo by Matthew Van Fleet
Matthew Van Fleet is famous for his beautifully photographed and highly interactive children’s books. Each page features tactile stimulation and moving parts, sure to hold even the youngest child’s attention.
 Cock-a-Doodle-Doo! Barnyard Hullabaloo by Giles Andreae
Giles Andreae is back again with this tour through the barnyard. Each page features a different animal and a short rhyme. The illustrations are fun and bright and the rhymes are playful. It’s definitely worth adding to your bookshelf.
 Lift the Flap Farm by Hinkler Books
This book can be a little tough to find, but it’s worth the effort. It’s chock full of photographs of farm animals, equipment and even produce. My boys love lifting the flaps, and I love the extra questions at the bottom of each page to encourage critical thinking or find hidden extras.
This is a fun and silly story about how a message can be distorted as it gets passed from person to person (or animal to animal as it were). It’s great for an older preschooler who can understand the concept of pass it on, but the humor might be lost on younger children.
 The Cow Loves Cookies by Karma Wilson
I love love love Karma Wilson. Her books never disappoint, and always include an attractive rhyming structure along with a playful plot. If you buy one fiction book from this list – buy this one. It’s just plain fun to read!
Be sure to check back later this week to see the final portion of our farm unit. Some of the best is still yet to come!

Is it just me or is this year just flying by? I can’t believe that June is already halfway over – where has Summer gone? Father’s Day is right around the corner, and I have the perfect easy gift to make for Dad. This shirt is perfect for those lazy parenting days when you just can’t quite adult but the kids still want to play. Lucky for you all it takes is one quick Walmart Run and 15 at the ironing board and your Father’s Day gift will be good to go!


Edit: A few readers have mentioned having issues getting the images to print properly. If your printer is having issues with formatting, I recommend visiting the Acrobat print dialogue to select Page Scaling, Tile Large Pages (or Tile All Pages). Set Tile Scale to 89% and overlap to 0″.

I hope the Dad in your life enjoys this gift – and that whoever ends up wearing it gets what I am sure is a much deserved break. (And maybe a Hot Wheels induced back massage??!)
Do you guys have any other exciting plans to make Father’s Day special? Let me know in the comments!

All good things must come to an end, and so too must my Ocean themed Tot School unit. I have had so much fun with my boys as we learned about aquatic life, and tried out some fantastic games and crafts. Today I’m going to show you the rest of what we tried out, and give you my final verdict on what to try (and what to stay away from!).

This was a really unique activity that turned out to be a lot of fun – even for Mommy! The supplies are minimal and the results are striking. Best of all – this is a activity that covers a wide range of ages so everyone can participate together.
Use your dish of water to wet the sponge and apply it to both sides of your construction paper. Let it get good and wet! Then use the chalk to draw on the wet paper. As the paper dries your chalk art will become bright and vivid. See? I told you it was crazy easy!
For the littlest tots the sensory experience of handling a sponge and wet paper will be fun enough. This is a very tactile art project that can create some really fun looking art.

I designed this free printable to encourage kids to get up and get moving. Each card features a cute ocean creature and an action for your child to perform. They can ‘Wiggle like a jellyfish’ or ‘Squawk like a Seagull’. It didn’t take long for this to turn into a game of ‘who can be sillier?’ at our house. After sitting still for an art project it’s great to get moving, so this was a perfect follow-up to our underwater chalk art.To download yours just sign up below and you’ll be sent an access code for my Free Digital Resource Library!
As I mentioned in Part I, Safari Limited Ocean Toobs played a huge part in our Ocean themed tot school unit. They worked very well in our water bead bin, but they’re also perfect in a dish of blue colored rice. Rice is always a safe bet if you feel that your little ones aren’t quite ready to be trusted with water beads.

If you haven’t made colored rice you can see how we do it here.
I LOVE to read, and I try my hardest to instill that love in my boys. I think the most important thing is to read as often as possible, so I always go out of my way to find books that go with our tot school themes. Here are a few of the books we enjoyed the most:

DK Eyewitness Books: Ocean – I adore the DK Eyewitness Series. The books offer great graphics along with a wide array of facts. Even if the books don’t hold your child’s attention, the eye-popping images should.
Commotion in the Ocean by Giles Andreae – This is a fun book for all ages. It features brightly colored illustrations accompanied by short poems. Each poem highlights a different ocean creature in a light and informative way.
Clark the Shark by Bruce Hale – Clark the Shark has a whole series of books now, but this is the original. It tells the tale of poor Clark who is just too big and rough for his smaller classmates. I think it’s definitely a must if you have boys, to help them learn to be considerate and not play too rough.
The Pout-Pout Fish by Deborah Diesen – One of my favorite children’s books, the Pout-Pout Fish is just fun to read. Who doesn’t love the face you make as you chant “Blub …. Blub …. Blub”? The prose has a great cadence and the end has a nice twist. Overall this is a book you will come back to time and again.
The Rainbow Fish by Marcus Pfister – This book is another classic, and if you haven’t read it you probably have at least seen it on a bookshelf before. It tells the tale of Rainbow Fish who learns the joys of sharing his beautiful shiny scales. The message of generosity is fantastic for children and the artwork is beautiful. It would be impossible to have an ocean unit without Rainbow Fish.


Our ocean unit was a ton of fun! I feel like my boys learned a lot and I will definitely pull out some of these activities again as Nugget gets older and is ready to participate more. The biggest hit was the ice-cavating activity and the least successful was the jellyfish bottle.
Comment below with your own hits and misses, and let me know if there is a tot school theme you would like to see soon.


 Dk Tractor Shaped Board Book
 Otis by Loren Long
 Pass It On! by Marilyn Sadler
